

Have you ever felt like picking up the brush and painting the entire house by yourself, because your walls have started looking accessively dull?
There are very few things as exciting as moving into a newly painted and furnished house. Isn’t it? And who doesn’t love the smell of freshly painted walls that magically makes you feel good?
If you are seriously considering painting your home, you should be very careful as there are a lot of things you need to know and keep in mind while giving your house that fresh coat of paint. Lucky you! We have just the right tips for you. So, if you are wondering how to paint a wall, here’s our step by step instruction list for you.
We bring to you the “must-know” house painting tips to keep you on top of the game!
Tip No 1: Plan Ahead
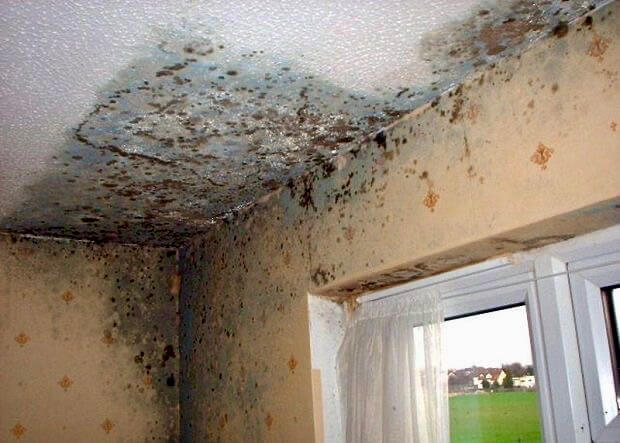
Don’t rush into painting your house or start the project without proper planning. You have to consider a few things before deciding the time for undertaking house painting. Understand the local weather patterns and finalise the time of the year when it’ll be dry with no rain and lower levels of humidity. You need to give both your exterior and interior paints the optimum amount of time to dry, without which it’ll not be durable. Find out any external leakage or water seepage in your walls and if so then have a waterproofing treatment done before you start your painting. Humidity and dampness are the biggest enemies of paint, so keep them at bay.
Tip No 2: The Most Important: Surface preparation & Primers
Your walls must be cleaned thoroughly and any dust or grime should be removed before starting the job. This will help the paint to adhere to the surface properly. Priming your wall is of utmost importance as the primer forms the strong, smooth & durable base for the paint. There are different primers for interiors and exteriors, so choose accordingly. Your walls need at least two coats of a good primer to provide the necessary protection and to make sure your paint gets an even finish. The better the priming is going to be, the more lasting & well-finished your painting will be.

Tip No 3: Cover to Protect
You must know that things will be messy. And it’s obvious that you don’t want your precious furniture and accessories to suffer during the mess.
-
Protect your room’s furniture, appliances, and all the belongings properly, or they don’t have spots of home colour on them. Cover them with a cloth and move them to another room so that you can paint without any obstacles. Also, group up whatever you have in the rooms at the centre and cover them all together for better protection and to give space to the workers for painting the walls without any hinderance.
-
Make sure you protect whatever you don’t want to get paint on. Make sure the floors are covered well so that your flooring is saved from paint splatters.
-
Don’t miss out on the little things that might look bad if they get paint-splattered on them– remember to cover the doorknobs, switchboards, light fittings, woodwork and any other such knick-knack that might easily be overlooked.

Tip No 4: Try Out the Shades
Before you think about how to paint a wall yourself, you must make your plan. If you have planned to paint your walls, you probably have some home decor ideas in mind. Think of how you can turn them into reality. What colour palette will you pick? Will all the four walls look the same, or will you have one accent wall?
How do you want the accent wall to look? What finish do you want – matte, metallic, or glossy? Think about all these things before you roll up your sleeves.
Instead of investing in a gallon of paint and wondering how it’ll look on your wall till it’s done, it’s smarter to buy a few sample quantities first and try them out on your walls.
Do the patch tests and try out combinations for different walls of the room, so that you can be confident about your choices before you take the plunge. You can also paint a piece of foam board and move it around the walls to see how the different kinds of light affect the look of the paint. Think, try, experiment and procrastinate all you want, before you go for the final colour.

Tip No 5: Use computer-generated digital colour codes.
Once all the shades are finalised , make sure you purchase all the colour from an authorised vendor’s Computerised digital Colour codes and get it in bigger quantities at a time to ensure uniformity throughout the room. If the colours are manually mixed and in smaller proportions, they have to be mixed time and again, this increaseses chances of discrepancy in the quantities that might result in variation of shades on the same wall. To avoid this, try to mix the entire quantity of paints for one colour at once to avoid any kind of remixing and enjoy a uniform look throughout the room.

Tip No 6: Know Your Paints
-
Paints nowadays come in a variety of textures, finishes, compositions and colours. It’s important to choose wisely, according to the look & finish you want on your walls.
-
Learn about the difference between latex paints, oil paints, water-based paints etc. and consult with paint experts to understand which type would be best for your walls, while being within your budget.
-
There are interior paints and there are external paints. Every paint has its specific function to perform for that particular surface.
-
Take care while mixing and matching different colours for different walls of the same room – there should not be too much variation in the finishes of two adjacent walls.
-
One accent wall can have a different texture or look, but the other three should have a similar finish, even if the colours are different.

Tip No 7: Wait ….Let it Dry
Your paint needs ample time to dry for a lasting finish. Make sure the paints get at least 24 hours to dry between coats. Once the painting’s complete, allow one to two days drying time before arranging the room or bringing in furniture, fixtures, fittings etc. The better the paint dries, the stronger and firmer will it be. You may have to exercise patience to allow the drying process, but it’s totally worth it in the long run.
Do not wash or wipe freshly painted surfaces before at least 15 days. Remember to store small quantities of all the paints in old jars or containers for touch-ups, if required. Label them properly so that you know which paint goes where, in case touch-up is needed somewhere.

The Conclusion:
Finally, the maintenance of your painted surface on regular basis is the Key. As frequently you maintain the painted surface fresher and brighter it will look.
Here you have a few maintenance tips to follow on a regular basis and your house will look fresh and new all the time.
-
Clean the painted surfaces once in a while with a mild soap and water solution so as not to let stains, dust or grime settle in deeply.
-
Do not scrub harshly and use a soft sponge or cloth for cleaning.
-
Note down the computerised digital codes of every shade used to paint the walls. In case, you need to repaint the part of the wall then there won’t be any colour shade difference.
-
Keep checking your walls from time to time for signs of peeling, flaking, cracking, damp and other issues.
-
If you notice anything, call for expert help immediately to solve the problem at hand. Delay or negligence in such matters can harm your house permanently.
Keep these pointers in mind , apply them and you can comfortably sail through the house-painting phase in a smooth, effortless manner.
Enjoy your newly painted abode and get ready to show off to your guests!
If you need help with your interiors.. get in touch with the Architect Nilesh Sawant team right away.


